
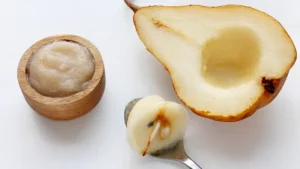
Discovering how to make pear baby food is an exciting step in your parenting journey. As your little one grows, introducing solid foods becomes a delightful adventure filled with new tastes and textures.
Pears are an excellent choice for a baby’s first food. They’re naturally sweet, easy to digest, and packed with essential nutrients.
Making pear baby food at home is simple, cost-effective, and allows you to control exactly what goes into your baby’s meal.
In this article, we’ll guide you through the process of creating delicious and nutritious pear baby food.
From selecting the perfect pears to preparing, cooking, and storing the puree, you’ll learn everything you need to become a baby food chef extraordinaire!
Selecting the Right Pears: The Foundation of Tasty Baby Food
Before we get our hands dirty (and believe me, they will get messy), let’s talk about choosing the perfect pears.
Think of this as the casting call for your baby food production – you want the stars of the show to be top-notch!
What to Look For:
- Ripeness: You want pears that yield slightly to gentle pressure. They should feel like a soft pillow, not a rock or a mushy mess.
- Appearance: Look for pears with smooth skin, free from bruises or blemishes. Remember, we’re aiming for baby food, not a science experiment!
- Variety: Bartlett, Anjou, and Bosc pears are great options. They’re like the Three Musketeers of the pear world – each brings something special to the table.
- Organic vs. Conventional: If possible, go organic. It’s like choosing a first-class ticket for your baby’s health journey.
How to Make Pear Baby Food: A Step-by-Step Guide
Alright, now that we’ve got our star ingredients, let’s roll up our sleeves and get cooking! Making pear baby food is easier than assembling that crib you struggled with (we’ve all been there).
Ingredients:
- 4-5 ripe pears
- Water (if needed for consistency)
That’s it! Simple, right? It’s like a magic trick – with just two ingredients, you’ll create something your baby will love.
Cooking Methods:
You’ve got options here, parents. Choose your fighter:
- Steaming: The health-conscious choice. It’s like giving your pears a spa treatment while preserving nutrients.
- Boiling: Quick and easy, but be careful not to overdo it. Think of it as a brief dip in the pool for your pears.
- Baking: For a richer flavor. It’s like sending your pears on a tropical vacation – they come back transformed!
Let’s break it down:
Steaming Method:
- Wash and peel the pears.
- Cut them into small chunks.
- Steam for about 5-7 minutes until tender.
Boiling Method:
- Prepare pears as above.
- Place in a pot with just enough water to cover.
- Bring to a boil, then simmer for 5-7 minutes.
Baking Method:
- Preheat oven to 350°F (175°C).
- Halve and core the pears (no need to peel).
- Place cut-side down in a baking dish with a splash of water.
- Bake for 20-25 minutes until soft.
Pureeing Techniques
Now, let’s turn those cooked pears into smooth, creamy goodness:
- Food Processor: The speedy option. It’s like a pear whirlwind in a bowl!
- Blender: For super smooth results. Think of it as giving your pears a ticket to the smoothest ride in town.
- Hand Mixer: For smaller batches. It’s like a mini-workout for your arms (hey, multitasking at its finest!).
- Good Old-Fashioned Masher: For a more textured puree. It’s the rustic, back-to-basics approach.
Whichever method you choose, blend or mash until you reach your desired consistency. Add a little cooking water or fresh water if needed.
Remember, we’re aiming for a texture your baby will love – not too thick, not too thin, just right. Goldilocks would approve!
Storage and Serving: Keeping Your Pear Perfection Fresh
Great job, chef! Now that you’ve created this pear-fiction (sorry, I couldn’t resist), let’s talk about keeping it fresh and serving it up:
Storage Tips:
- Refrigerator: Store in airtight containers for up to 48 hours. It’s like tucking your pear puree in for a short nap.
- Freezer: Freeze in ice cube trays or small containers for up to 3 months. It’s like cryogenic storage for your baby food!
Serving Suggestions:
- Warm it slightly for a cozy treat.
- Mix with a little breast milk or formula for a familiar taste.
- Start with small portions – about 1-2 tablespoons for beginners.
Adding Variety: Spicing Up Your Pear Baby Food Game
Ready to take your pear baby food to the next level? Let’s jazz it up a bit! (But remember to introduce new foods one at a time and wait a few days between new ingredients to watch for any allergic reactions.)
Mix-in Ideas:
- Other fruits: Apple, banana, or peach purees blend beautifully with pear.
- Veggies: Try mixing in some pureed carrots or sweet potato for a nutrient boost.
- Grains: A little cooked and pureed oatmeal or rice can add texture and nutrients.
- Spices: A tiny pinch of cinnamon or ginger can be a flavor adventure (check with your pediatrician first).
Here’s a fun mix-and-match table to inspire your culinary creativity:
|
Base |
Fruit Mix-in |
Veggie Mix-in |
Grain/Spice |
|
Pear |
Apple |
Carrot |
Oatmeal |
|
Pear |
Banana |
Sweet Potato |
Cinnamon (tiny pinch) |
|
Pear |
Peach |
Butternut Squash |
Rice Cereal |
Safety Considerations: Keeping Your Little One Happy and Healthy
Safety first, always! Here are some golden rules to keep in mind:
- Cleanliness is key: Wash your hands, utensils, and all surfaces thoroughly. Think of it as creating a germ-free zone for your baby’s food.
- No honey for babies under one year: It’s a no-go zone due to the risk of botulism.
- Avoid added sugars and salt: Your baby’s taste buds are delicate – let the natural flavors shine!
- Watch for allergies: Introduce new foods one at a time and wait a few days before trying another new food.
- Temperature check: Always test the temperature before serving. Room temperature or slightly warm is perfect.
How to Make Pear Puree for a 7-Month Old?
Making pear puree for your 7-month-old is similar to our basic recipe but with a few age-specific tweaks:
- Texture: Aim for a smoother consistency. Your 7-month-old is still getting used to solids, so think “silky smooth.”
- Quantity: Start with small amounts, about 2-3 tablespoons per feeding.
- Mixing: You can combine the pear puree with breast milk, formula, or baby cereal for a familiar taste and added nutrition.
- Spoon-feeding: At seven months, most babies are ready for spoon-feeding. Make it fun and interactive!
- Frequency: Offer pear puree a few times a week, along with other fruits and vegetables.
Remember, every baby is different. Some might gobble it up, while others might need time to warm up to new tastes and textures. Patience is key!
How to Prepare Pear for Baby Constipation?
Uh-oh, is your little one feeling a bit backed up? Pears to the rescue! They’re nature’s gentle laxative, perfect for helping things move along.
Here’s how to prepare pear to help with baby constipation:
- Choose ripe pears: Riper fruits have more fiber, which is great for constipation.
- Leave the skin on. If your baby is over eight months old and used to textures, try pureeing with the skin on for extra fiber.
- Don’t dilute: Use less water when pureeing to keep the fiber concentration high.
- Serve it warm: Slightly warm pear puree can be more effective for constipation relief.
- Combine with prunes: For extra constipation-fighting power, mix pear puree with some prune puree.
- Offer frequently: Give small amounts of pear puree throughout the day.
Remember, while pears can help with constipation, always consult your pediatrician if your baby’s constipation persists or if you have any concerns.
What can you mix pear with for baby food?
When introducing pears to your baby’s diet, you can create delicious and nutritious combinations. Try mixing pears with apples for a sweeter fruit mix, or combine them with oatmeal for added texture. For a protein boost, mix pears with Greek yogurt or cottage cheese.
Learn how to make it in detail:
Bottom Line: Your Journey to Pear-fact Baby Food
Congratulations, super parent! You’ve now mastered the art of making pear baby food. It’s like you’ve earned your first Michelin star in the world of baby cuisine!
Remember, making your baby food isn’t just about nutrition – it’s an act of love. Each spoonful you prepare is packed with care, effort, and the best ingredients you can provide. Plus, you’re setting the stage for a lifetime of healthy eating habits.
Don’t be discouraged if your first attempt isn’t perfect. Like your baby learning to crawl, it takes practice. Before you know it, you’ll be whipping up gourmet baby meals like a pro.
So, go forth and conquer the world of homemade baby food! Your little one’s taste buds (and tummy) will thank you. And who knows? This might be the start of your journey to becoming the next great chef – even if your only critic is a toothless wonder in a high chair!
Happy cooking, and may your days be filled with pear-shaped smiles and giggles!
1 thought on “how to make pear baby food? A Complete Guide for New Parents”