
When it comes to homemade baby food, one of the most common questions parents ask is, “How long does Homemade Baby Food last?” Whether you’ve made a big batch or just a few servings, knowing how to store baby food properly ensures your little one stays safe and nourished.
Generally, homemade baby food will last 3–4 days in the fridge and up to 3 months in the freezer. Be sure to store it in airtight containers to keep it fresh. If unsure, it’s always safer to freeze it immediately rather than leave it in the fridge for too long.
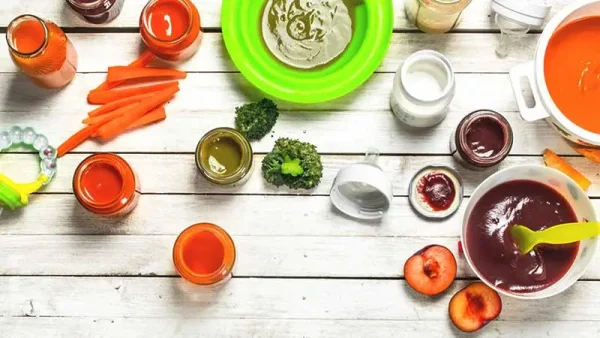
This article will guide you on storing baby food, freezing tips, and signs that it’s time to toss. These guidelines will help you serve your baby healthy, fresh meals every time.
How Long Does Homemade Baby Food Last in the Fridge?
When you prepare homemade baby food, it’s essential to store it properly to ensure it remains fresh and safe for your little one. Refrigeration is often the best option if you use baby food within a few days. But how long does homemade baby food last in the fridge?
The general rule of thumb is that homemade baby food can last in the refrigerator for up to 48 to 72 hours (2 to 3 days), depending on the type of food and how it’s stored. It’s essential to keep it sealed tightly in an airtight container to prevent exposure to air and bacteria, which could cause spoilage.
Factors That Affect Shelf Life in the Fridge
Several factors can affect how long homemade baby food stays fresh in the fridge:
- Ingredients Used: Some ingredients, like pureed vegetables or fruits, may spoil faster than others. Foods with higher moisture content, such as pureed sweet potatoes or squash, tend to last a little less time compared to dryer foods like rice or oats.
- Storage Container: Using airtight containers or baby food storage jars can help lock in freshness and keep your baby food safe for longer. Avoid storing food in containers that are not completely sealed, as this could lead to bacterial growth.
- Temperature: Always store homemade baby food in the coldest part of the fridge (typically the back). Make sure your fridge is at the proper temperature, between 35°F and 40°F (1.6°C – 4.4°C). Any fluctuations in temperature can reduce the shelf life of your food.
- Hygiene: Cleanliness is vital when preparing homemade baby food. Wash your hands, sanitize your utensils, and clean your storage containers thoroughly before use to prevent bacteria from contaminating the food.
How to Tell if Homemade Baby Food Has Gone Bad?
Even with proper storage, baby food can spoil. Here are some signs to look out for that indicate your homemade baby food has gone wrong:
- Off Smell: If the food has an unusual or sour odor, it’s time to throw it out.
- Color Change: A noticeable color change can signify the food is no longer fresh. For example, pureed carrots might turn brown or dull, indicating spoilage.
- Texture Issues: If the texture becomes too watery or mushy, or if the food has an off-putting, slimy feel, it’s best to discard it.
- Mold: If you see mold growing on the surface of the food, definitely dispose of it immediately.
Best Practices for Storing Homemade Baby Food in the Fridge:

To get the most out of your homemade baby food while keeping it safe, follow these helpful tips:
- Cool Before Storing: Always allow homemade baby food to cool completely before storing it in the fridge. Hot food can raise the temperature inside the refrigerator, leading to faster spoilage.
- Use Small Containers: For convenience and to avoid wasting food, store homemade baby food in small portions that your baby can finish in one sitting. This way, you won’t have to worry about leftovers going bad.
- Label and Date: Label each container with the type of food and the date it was prepared. This helps you track how long the food has been in the fridge.
- Don’t Refreeze: If you’ve already thawed frozen homemade baby food and stored it in the fridge, don’t refreeze it. Once melted, it should be used within 24 to 48 hours.
By following these guidelines, you can keep your homemade baby food fresh and safe for your baby. So, while making large batches of food ahead of time is tempting, remember that freshness is crucial to your little one’s meals!
How Long Can You Keep Homemade Baby Food in the Freezer?
Freezing homemade baby food is a fantastic way to extend its shelf life and save time. When stored properly, homemade baby food can last up to 3 to 6 months in the freezer. This makes it super convenient for busy parents who want to prepare food in advance and have nutritious meals ready for their baby at any time.
However, it is essential to use the proper containers and methods to ensure the food stays fresh and safe. Consider using ice cube trays, freezer-safe containers, or freezer bags when freezing baby food. These methods preserve the food for longer and make it easy to defrost small portions when needed.
Tips for Freezing Homemade Baby Food:
- Portion control: Freeze baby food in small portions to avoid wasting leftovers. Ice cube trays are great for this, as each cube holds a perfect serving size.
- Label and date: Always label each container with the type of food and the date it was made. This helps you track how long it has been in the freezer and ensures you use it before it loses flavor or nutrients.
- Cool before freezing: Let the food cool to room temperature before freezing to prevent condensation inside the containers, which can affect the texture and quality.
Signs Your Homemade Baby Food Has Gone Bad
Making homemade baby food is a beautiful way to ensure your little one gets the freshest ingredients, but it also comes with knowing when to toss it. After all, babies have sensitive tummies, and serving spoiled food can lead to health issues. So, how can you tell when your homemade baby food has gone wrong? Here are some clear signs to watch for:
1. Unpleasant or Sour Odor
One of the first tell-tale signs that your homemade baby food has spoiled is a change in its smell. Fresh baby food should have a mild, natural fragrance. If the food starts to smell sour, rancid, or off, it strongly indicates that bacteria or mold may be present. Trust your nose — if it smells bad, don’t take any chances.
2. Mold Growth
Mold is a definite red flag when it comes to baby food. If you spot fuzzy or discolored spots on the food’s surface, something has gone wrong. Mold can grow even on food stored properly if kept for too long, so it’s always best to check before serving.
3. Discoloration or Changes in Texture
Changes in color and texture can happen as food sits for a while. For example, vegetable purees may turn brown, and fruits can become overly soft and mushy. This doesn’t necessarily mean the food is spoiled, but it could indicate oxidation (when it reacts with air) or bacterial growth. If the food has separated into liquid and solid layers unnaturally, it’s best to throw it out.
4. Off Taste
If you’ve tasted some of the food with a strange or unpleasant flavor, that’s another sign it hasn’t gone well. Spoiled baby food will often taste sour or tangy in a way not characteristic of the original ingredients. Always taste-test (but only a small amount) before offering it to your baby, especially if the food has been sitting for a while.
5. Slimy or Sticky Texture
Sure, like fruit-based baby food, purees can become slimy or sticky when they’re no longer fresh. If you notice an unusual texture that feels slippery or gooey to the touch, this can indicate bacterial contamination. Even if it still smells fine, it’s best to err on caution and dispose of it.
6. Bubbling or Fizzing
If your baby food is stored in a container and you notice bubbling or fizzing, that’s a clear sign of fermentation or microbial activity. While this might be okay in some fermented foods, it’s a bad sign for baby food. Always check the seal of containers and be cautious about any unusual reactions.
7. Leaking or Swelling Containers
A swollen container or a leaking seal can indicate the food is going wrong. This can happen when bacteria multiply, producing gases that build up inside. If you spot a swollen jar or container or notice any signs of leakage, it’s time to toss that food.
8. Expiration of Storage Time
Even though you may store your homemade baby food correctly, it has a limited shelf life. Here’s a quick guide on how long baby food can last:
| Storage Type | How Long Does It Last? |
| In the fridge (stored in airtight containers) | 1-3 days (depending on ingredients) |
| In the freezer (stored in freezer-safe containers) | 1-3 months |
| After opening a commercial for baby food | 24-48 hours (refrigerated) |
Always label your containers with the date they were made so you can keep track of freshness. If it’s been longer than the recommended time, it’s safer to discard it.
What To Do If You Spot These Signs
If you notice any of the above signs, it’s important to err on caution and throw the food out. While it can be tempting to keep food around longer, babies have delicate immune systems and are more susceptible to foodborne illnesses.
How to Store Homemade Baby Food Properly?

Storing homemade baby food correctly is crucial to ensure its freshness and safety. Babies have delicate immune systems, so following proper storage guidelines is essential to avoid any risk of foodborne illness or spoilage. Let’s dive into the best practices for storing baby food, from cooling to sealing to freezing.
1. Cool Baby Food Quickly Before Storing
Cooling it quickly is a must before you store any homemade baby food. Leaving food at room temperature for too long can cause bacteria to increase, making your baby sick.
Here’s what you can do:
- Spread it out: After cooking, let the baby food cool down quickly by spreading it on a clean plate or shallow container.
- Use an ice bath: Place the baby food container in a giant bowl filled with ice and water to speed up the cooling process. Stir occasionally to help it cool faster.
The goal is to reduce the food’s temperature to below 40°F (4°C) within two hours to avoid the growth of harmful bacteria.
2. Store Baby Food in Clean, Airtight Containers
Once the baby food has cooled, storing it in airtight containers is essential. Not only will this prevent contamination from external sources, but it will also help preserve the food’s freshness. Here are some great container options:
- Glass jars or containers are perfect for storing homemade baby food. They are non-toxic and help keep the food fresh. They also don’t retain odors or stains, making them easy to reuse.
- Plastic containers with secure lids: If you’re using plastic containers, ensure they are BPA-free and have a good seal to prevent air from entering.
When storing, always label the containers with the date the food was made. This will help you keep track of its freshness.
3. Portioning for Convenience
When making homemade baby food in batches, portioning out servings before storing them is a good idea. This makes it easier to thaw and serve food in the right amounts without wasting any. You can use:
- Ice cube trays: Fill each compartment with individual servings of food and freeze them. Once frozen, pop them out and store them in a zip-top bag or airtight container.
- Silicone molds are also marvelous for portioning food and are reusable, making them a more eco-friendly option.
This will make feeding time more manageable and ensure you’re not constantly reheating a large amount of food.
4. Store Baby Food in the Refrigerator or Freezer.
The storage method depends on when you plan to use the food. Here’s a simple guide:
- Refrigeration: Homemade baby food can typically last 2 to 3 days in the fridge. Ensure your fridge is set to 40°F (4°C) or lower.
- Freezing: You can freeze the food for more extended storage. Frozen baby food can last up to 1 to 3 months, depending on the type of food. Just label it with the date and use it within that time frame.
If you freeze baby food in ice cube trays, it’s easy to pop out the servings and thaw only what you need, reducing waste.
5. Thaw Baby Food Safely
You must thaw the frozen baby food when you’re ready to serve it safely. The best methods include:
- Overnight in the fridge: This is the safest and most recommended method for thawing. Take the baby food from the freezer the night before and leave it in the refrigerator to thaw slowly.
- Quick thaw in a bowl of warm water: If you’re in a rush, place the baby food in a sealed container and immerse it in a bowl of warm (not hot) water for 10 to 15 minutes.
- Microwave: You can also use the microwave to thaw baby food, but stir the food well after microwaving to avoid hot spots that could burn your baby’s mouth.
Once thawed, never refreeze the food. And don’t leave it sitting at room temperature for too long—use it within a few hours.
6. Keep Baby Food Safe from Contamination
Food safety is crucial when it comes to your little one.
Here are a few tips to keep things safe:
- Wash hands and utensils: Always wash your hands before preparing or handling baby food. Ensure all utensils, including blenders, spoons, and bowls, are clean.
- Avoid double-dipping: When serving your baby, avoid dipping the same spoon back into the food after it’s touched their mouth. This helps prevent introducing bacteria from your baby’s mouth into the food.
Freezing Baby Food: Step-by-Step Guide

Freezing homemade baby food is one of the best ways to preserve its freshness and nutritional value while ensuring you have convenient meals for your little one.
Whether batch-cooking a week’s worth of food or preparing meals in advance, freezing baby food helps you save time, money, and effort. But, as with any food storage, there are a few key steps to ensure the food remains safe, tasty, and nutritious.
Step 1: Cook and Cool the Food Properly
Before you consider freezing homemade baby food, it’s essential to cook it properly. Whether making purees, mashed veggies, or blended fruits, ensure the food is cooked consistently for your baby’s age and eating stage.
Once cooked, let the food cool down completely before freezing it. This is crucial! Freezing food while still warm can lead to ice crystals forming, affecting the texture and taste when you thaw it later. So, let the food sit at room temperature for about 20-30 minutes before transferring it to the freezer.
Step 2: Portion and Package the Food
Now comes the fun part: deciding how to portion and package the food for freezing. You want to make sure you’re freezing in small portions for convenience. Babies eat small amounts at a time, so there’s no need to freeze a giant batch simultaneously.
Ice cube trays are a fantastic way to freeze baby food in individual servings. Spoon the cooled food into the ice cube tray and smooth it out to remove any air pockets.
Once frozen, you can transfer the cubes into freezer bags or airtight containers for easy access. Label the bags with the type of food and the date it was made to track how long it’s been stored.
Alternatively, if you prefer not to use ice cube trays, you can use baby food containers or small freezer-safe jars. Make sure there’s enough room for the food to expand as it freezes.
Step 3: Freeze Immediately
Once you’ve portioned out the food, place it directly into the freezer. If you’re using ice cube trays, put them in a flat, stable spot so the food doesn’t shift and form uneven portions.
The goal is to get the food into the freezer quickly to prevent bacteria from growing and to ensure it freezes properly.
Avoid stacking containers on top of each other before the food is fully frozen—this can cause the food to become compressed and lose its shape and texture.
Step 4: Label and Store Properly
Properly labeling is key to tracking what’s what when storing frozen baby food. Write the date when the food was made and the type of food on each container or freezer bag. That way, you’ll know exactly what you have in the freezer and can easily rotate out older foods.
Using airtight containers or freezer bags is also a good idea to prevent freezer burn and ensure the food stays fresh. Vacuum-sealing is another excellent option if you want to ensure maximum freshness.
Step 5: Thaw and Serve Safely
When serving frozen baby food, it’s important to thaw it properly to maintain its quality and ensure it’s safe for your baby to eat.
- Thaw in the refrigerator: The safest method for thawing frozen baby food is to move it from the freezer to the fridge the night before. This way, the food can thaw slowly and safely and won’t spend too much time in the “danger zone” temperature (between 40°F and 140°F).
- Use the microwave: If you need the food sooner, you can microwave the food. Stir it well to avoid hot spots, and test the temperature before serving.
- Don’t refreeze: Once the food has been thawed, do not refreeze it. Thawed food should be used within 24-48 hours to ensure quality and safety.
Step 6: Keep Track of Storage Time
As a general rule of thumb, homemade baby food can be kept in the freezer for up to 3-6 months. After that, it may begin to lose its nutritional value and taste. It’s essential to keep track of the dates on your labels and rotate your food, using the oldest food first.
Quick Tips for Freezing Baby Food:
- Don’t freeze food that contains dairy or eggs. It’s best to avoid freezing purees with dairy (like yogurt or cheese) or scrambled eggs, as they don’t freeze well and may change in texture when thawed.
- Avoid adding salt or sugar to baby food before freezing—babies don’t need extra salt or sugar, and freezing will not prevent this from affecting the food.
- If your baby is new to solids, freezing foods in single-ingredient portions is a good idea. This makes it easier to introduce new foods one at a time, which is especially important for tracking allergies.
Following these simple steps, you can confidently freeze homemade baby food while preserving its flavor and nutrients. Freezing makes mealtime easier for you and ensures your little one always has a healthy and homemade meal ready to go.
Tips for Making Homemade Baby Food in Batches

Making homemade baby food in batches is a real-time-saver, especially for busy parents. It allows you to prepare several meals at once and store them for later use. Here are some simple tips to make batch cooking a breeze:
- Choose versatile ingredients: Start with foods that freeze well, like sweet potatoes, carrots, peas, and apples. These can be easily blended and stored for multiple meals.
- Prep and cook in bulk: Steam or roast large quantities of your chosen ingredients simultaneously, which will save time on cooking later.
- Use ice cube trays: After pureeing the food, pour it into ice cube trays to create individual servings. Once frozen, you can transfer the cubes into freezer bags for easy storage.
- Label and date: Always label your containers with the food type and date you made it. This helps you keep track of freshness.
- Please keep it simple: Start with basic purees and then mix different combinations when ready to serve. This allows for variety without overwhelming yourself.
Conclusion:
In the end, homemade baby food can be a convenient and nutritious option for your little one. With the proper storage methods, it can last for several days in the fridge or several months in the freezer. Following the guidelines above can ensure your baby’s food stays fresh, safe, and tasty.
So, remember to label your containers, store foods properly, and always check for signs of spoilage. Your baby will thank you for the nutritious meals you’ve prepared — and you’ll be able to rest easy knowing they’re safe and healthy.
1 thought on “How Long Does Homemade Baby Food Last? A Complete Guide to Storing, Freezing, and Using It Safely”
Comments are closed.